Happy Earth Day! Earth Day is one of my favorite holidays since it’s a day when the rest of the world thinks a little bit more about how we can better sustain and protect our gorgeous home, planet Earth. A neighborhood clean-up, a hike, planting seeds for our garden, planting trees, writing to politicians… there are many things you can do to celebrate, though truly, Earth Day is every day. This year is quite different as we shelter at home, but I hope that more reflection on our daily practices and their impacts on the earth still happens, and that when we find our way back to socialization, we keep those in mind as we reshape society to be a more sustaining one, for all life. Earth is getting a much-needed breather while we as the human race face the coronavirus.
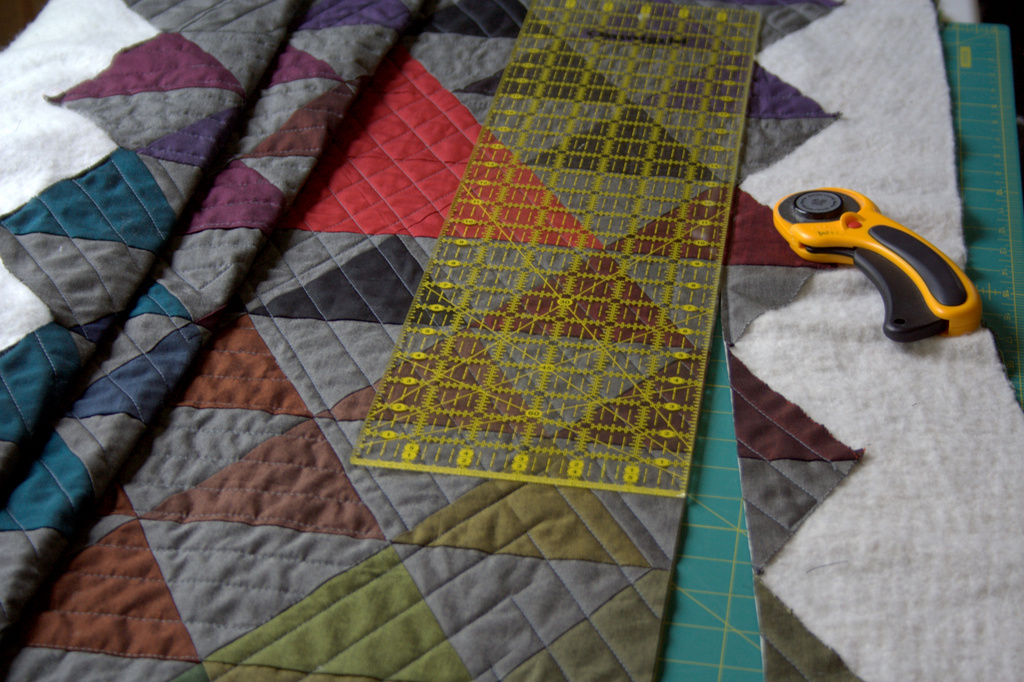
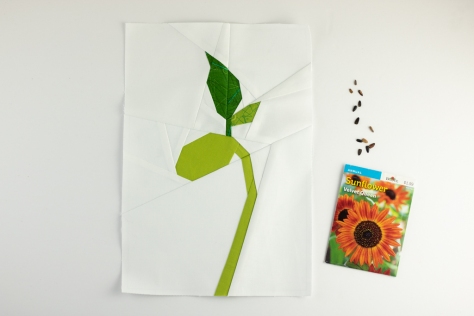
With a focus on hope and new beginnings, I thought today would be the perfect day to re-release my updated Bean Sprout block pattern, since there’s nothing like a freshly sprouted plant to celebrate spring, new life, and the wonder of discovery. As many of you likely know, I’ve been working with the amazing Lindsie Bergevin to convert some of my older patterns into fresher, more professional, and often more diverse versions and Bean Sprout is the latest to receive a make-over.
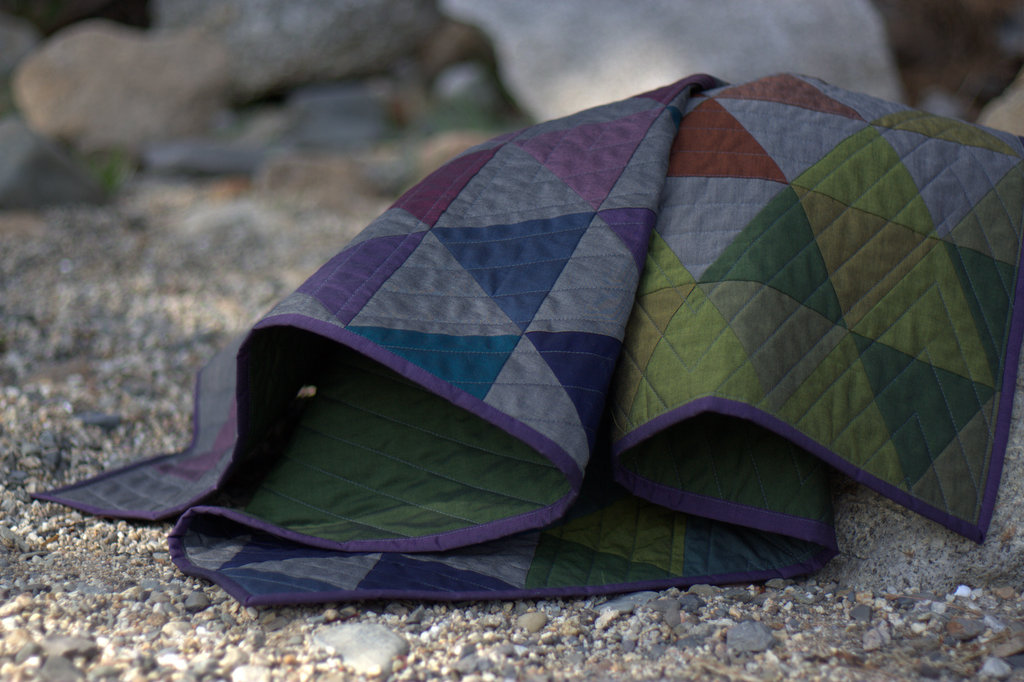
With a bit more pattern details, more professional layout, and an added block size (welcome, dear 4″x6″ block!), the newest Bean Sprout block pattern includes all of the great things from the original 2016 design, but in a clearer, crisper presentation. You can buy it now from my Payhip shop HERE. You can use code BIRTHDAY for 15% off it and all other patterns in my shop through the end of April, since I believe in celebrating birthdays all month long.
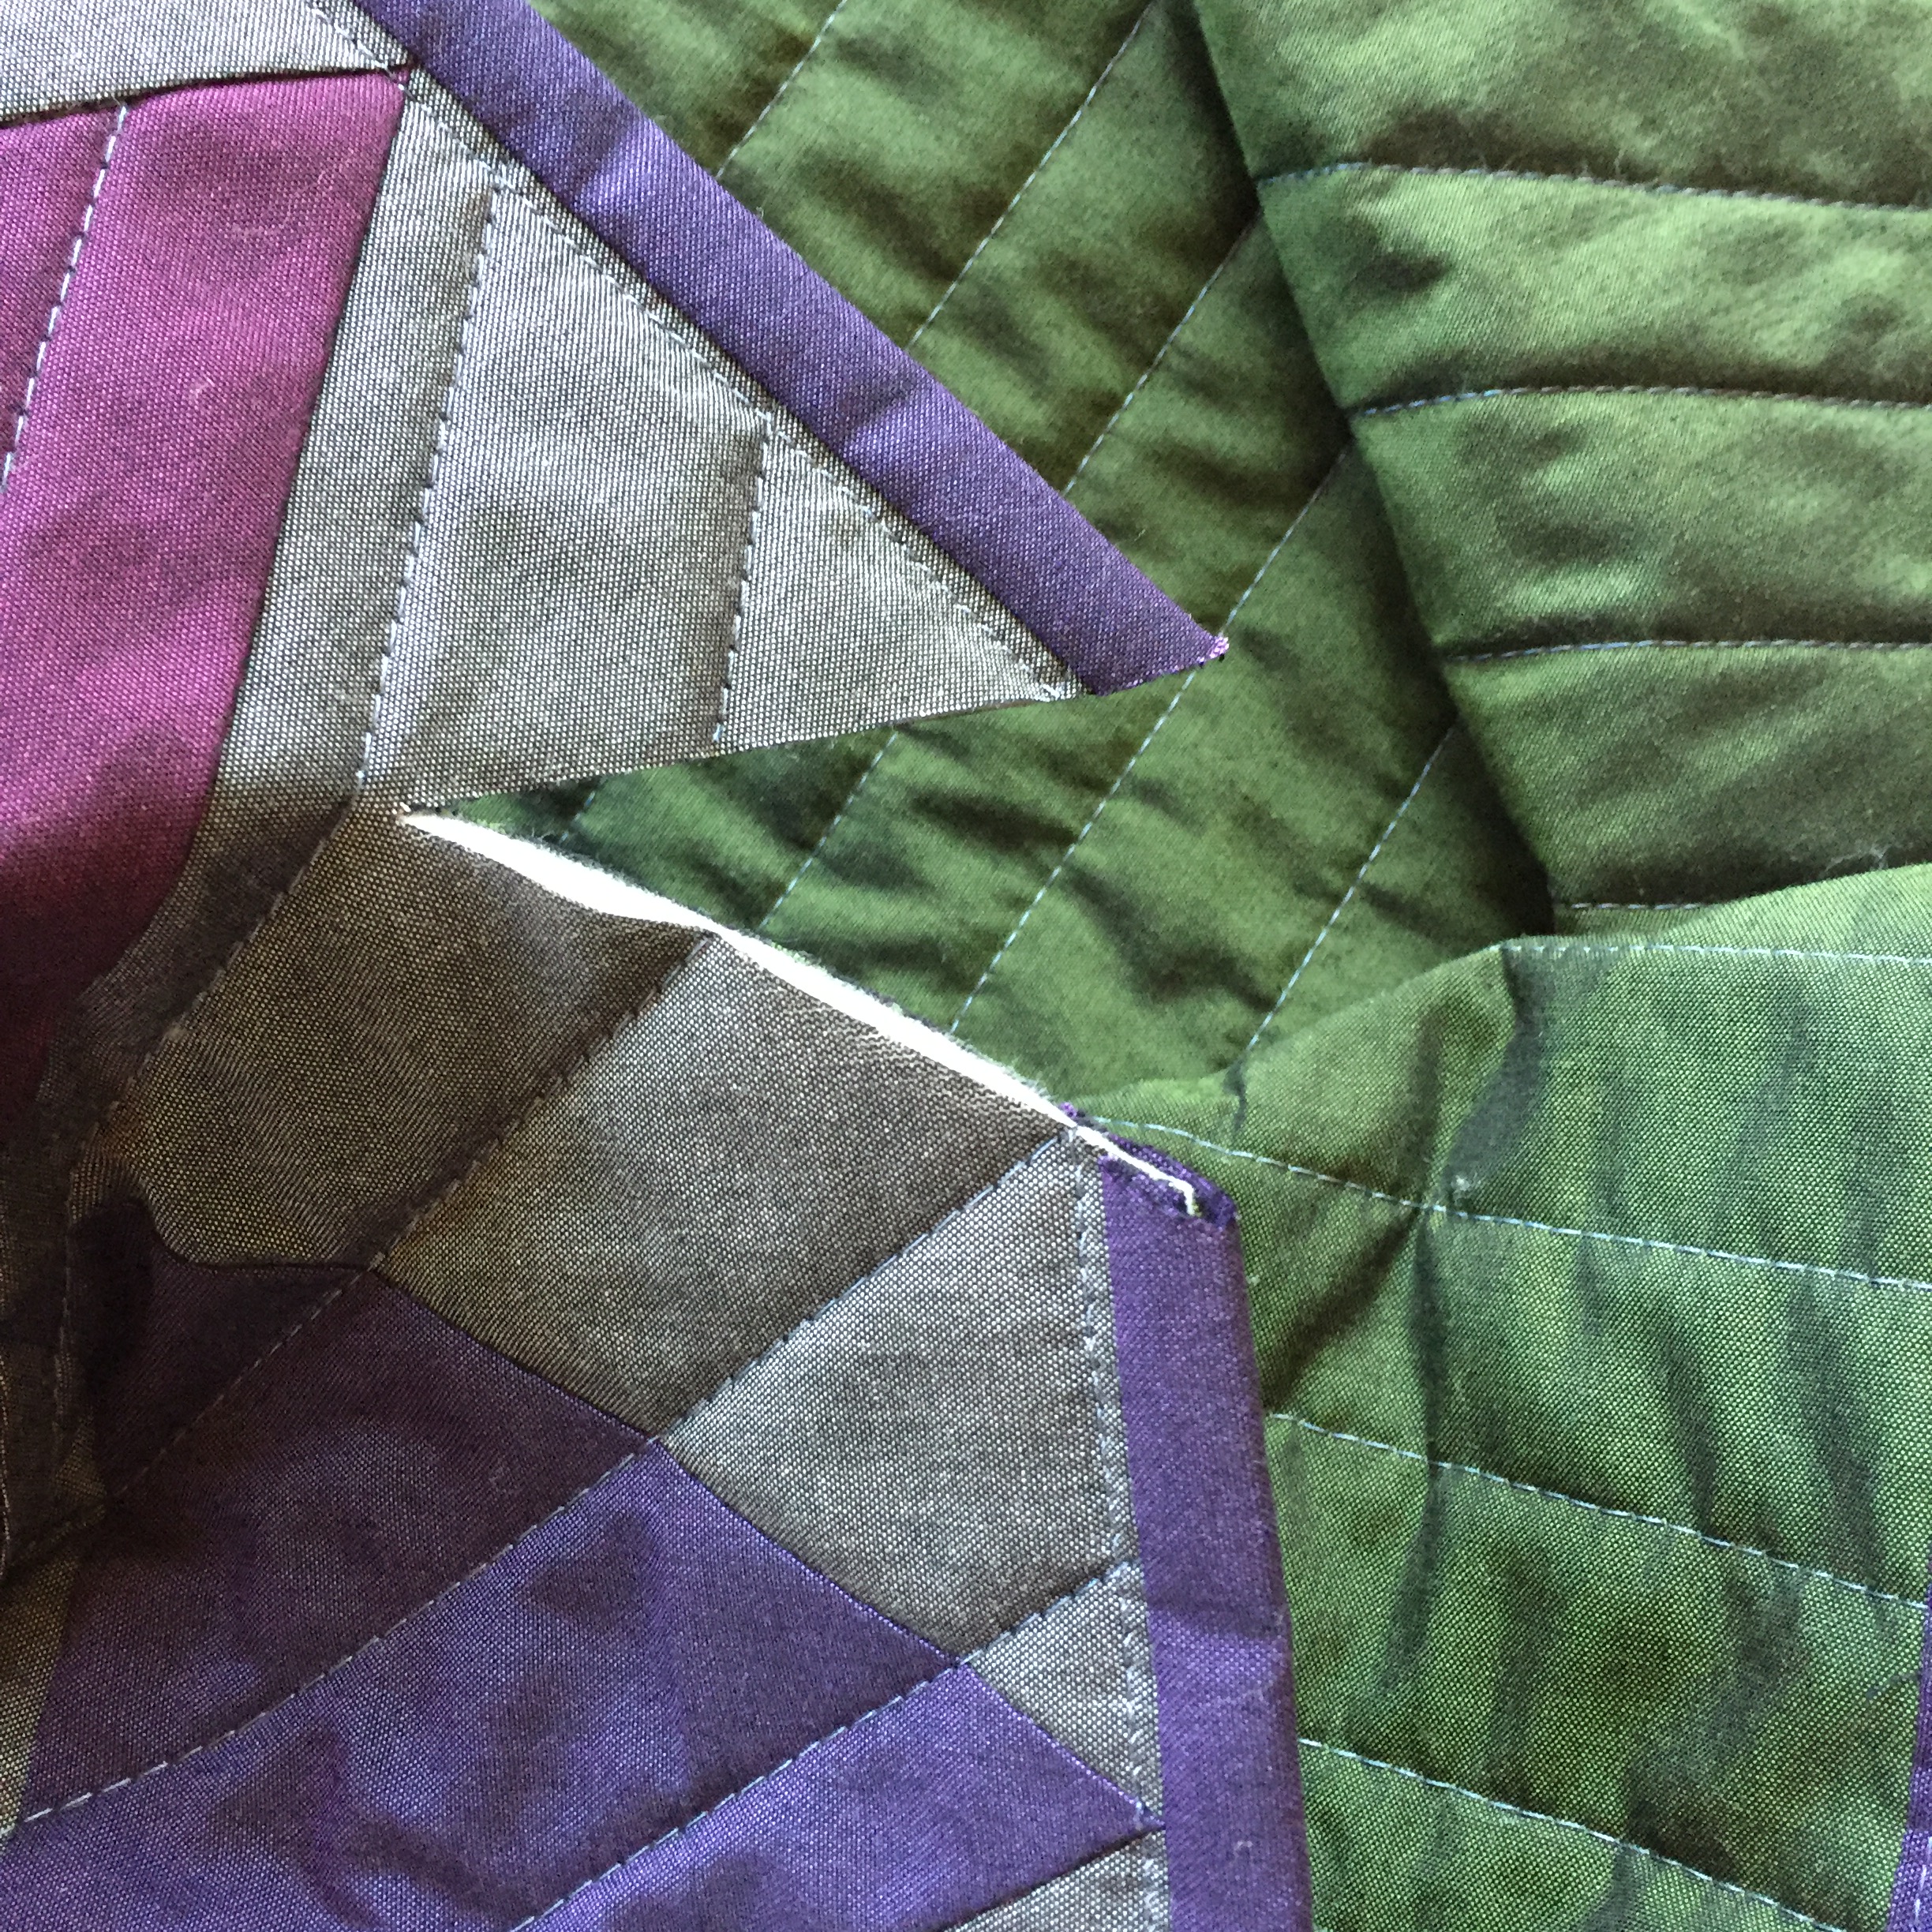
You can see a few other versions of this block I’ve sewn up in the past in its original release post HERE. It’s always fun to look back into the blog archives, isn’t it!?
I particularly love the idea of a pillow, and very well might be making another one of these someday soon. I’d love to see what YOU make with the pattern, so please use #beansproutblock and tag me @nightquilter on social media so that I can see your beautiful work.
Happy stitching, happy Earth Day, and happy spring. Be well.
I recently faced the demon that was my chaotic sewing space and have been organizing with the help of my dear friend Alessandra. Yesterday when I shared the above photo of my newly cleared cutting table on Instagram, there were many questions about my rainbow of skinny bins hanging along the side of it. My skinny bins were made using a tutorial I wrote for Quilt Theory years ago, for a fabulous fabric party hosted by Mathew at Mister Domestic, and I use them to sort my tiny scraps by color. You know, those scraps that are too small to fold up again, but the perfect size for some tiny piecing? As I’m cutting, I just toss them into the color-coordinating skinny bin and viola! I thought it was a great time to share the tutorial here on my blog, so today’s your day!
The following is a blast from the past–May 2017 to be exact!–and the tutorial on how to make your very own fabric skinny bins. Enjoy, and please do tag me @nightquilter and #fabricskinnybin on social media if you make one (or ten!)!
When you’re designing quilt patterns or even simply selecting fabrics for a quilt, having color cards from different fabric and thread manufacturers is extremely helpful. There’s nothing like having each exact thread and fabric possibility right at your fingertips while you’re fine-tuning your colorway. Most companies offer their color cards for sale, so anyone can benefit from having a rainbow of actual fabric and thread samples at their fingertips.
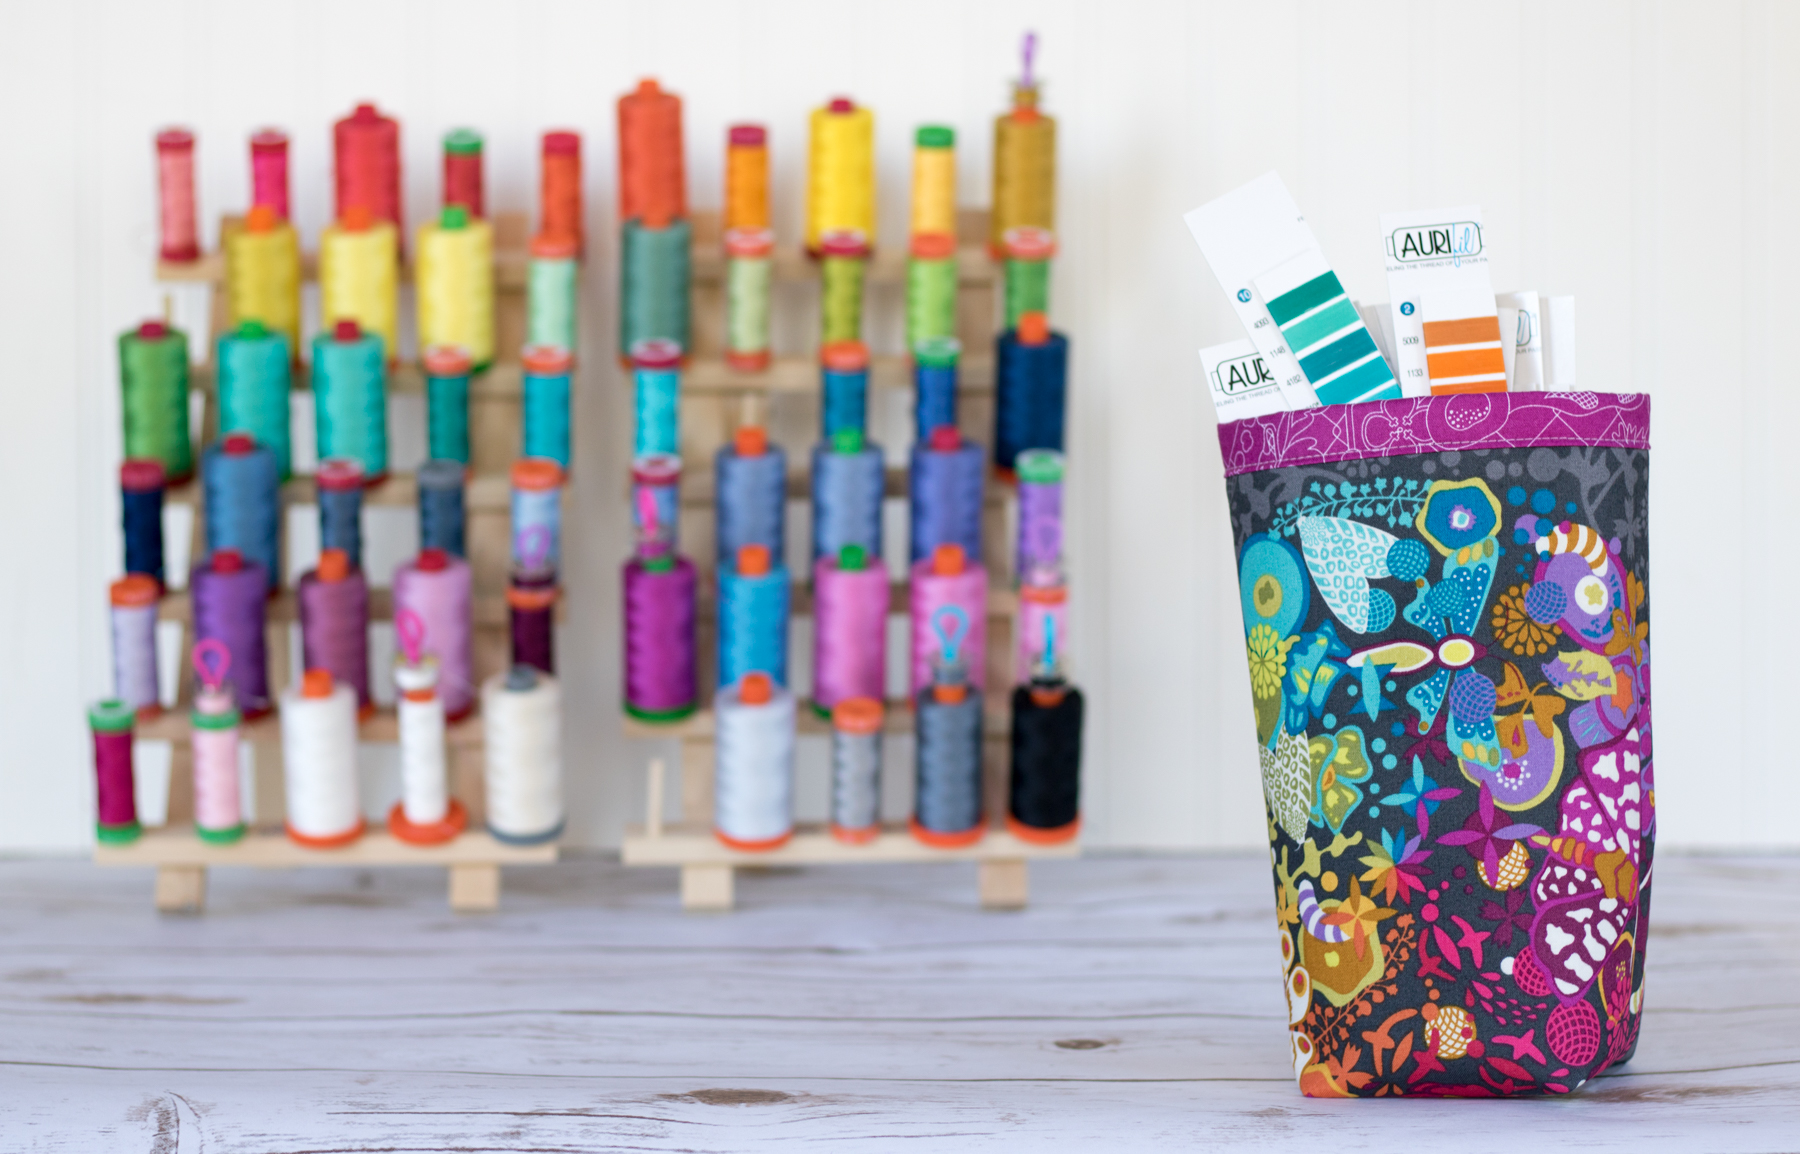
A few weeks ago, many fabric and thread companies were kind enough to send color cards to the Quilt Theory team to help with our planning. While brainstorming different ways to store and use these color cards, I realized that a skinny fabric bin I had designed to help sort my tiny scraps would also be perfect storage for the Aurifil thread color card strips once they were cut apart. While cutting up color cards seems terrifying at first, we’ve found the amount it helps ease comparisons between different color options and selection of a perfect fabric-thread match outweighs the initial anxiety about cutting into the card. You can see many other storage options in our guest post over at Auribuzz here.
Today I’m excited to share a tutorial on how to make your very own Skinny Bin, perfect for storing your Aurifil thread color card strips. The Skinny Bins are very versatile, so you can make one even if you don’t yet have Aurifil thread color card strips; they are perfect for sorting tiny scraps or catching threads, and just happen to make a lovely wine bottle cozy, too!
Let’s get started!
Gather your materials:
15” x 11” fabric for outer panel
15” x 11” fusible fleece
15” x 12” fabric for lining
Thread – we suggest 50wt Aurifil thread
Quilting ruler
Rotary cutter
Scissors
Marking pencil or tool
Iron and pressing surface
Sewing machine
Making the Exterior
Step 1
First, fuse the fusible fleece to the wrong side of your outer panel fabric piece, following the manufacturer’s directions.
Step 2
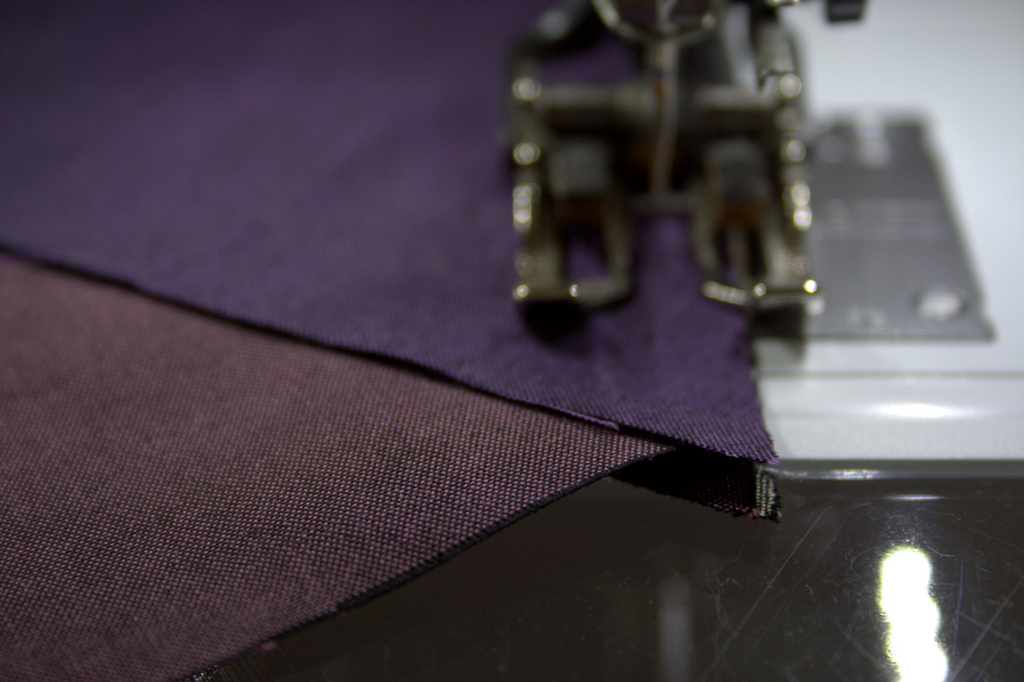
Sew the short ends right sides together using a ⅜” seam allowance. You will have a tube with both ends open. Press seam open.
Step 3
Centering your pressed seam (3 ½” of fabric should be on either side of the seam), press the tube flat, creating clear side creases.
Step 4
Sew along the bottom with a ⅜” seam allowance. Do not turn right-side out yet.
Step 5
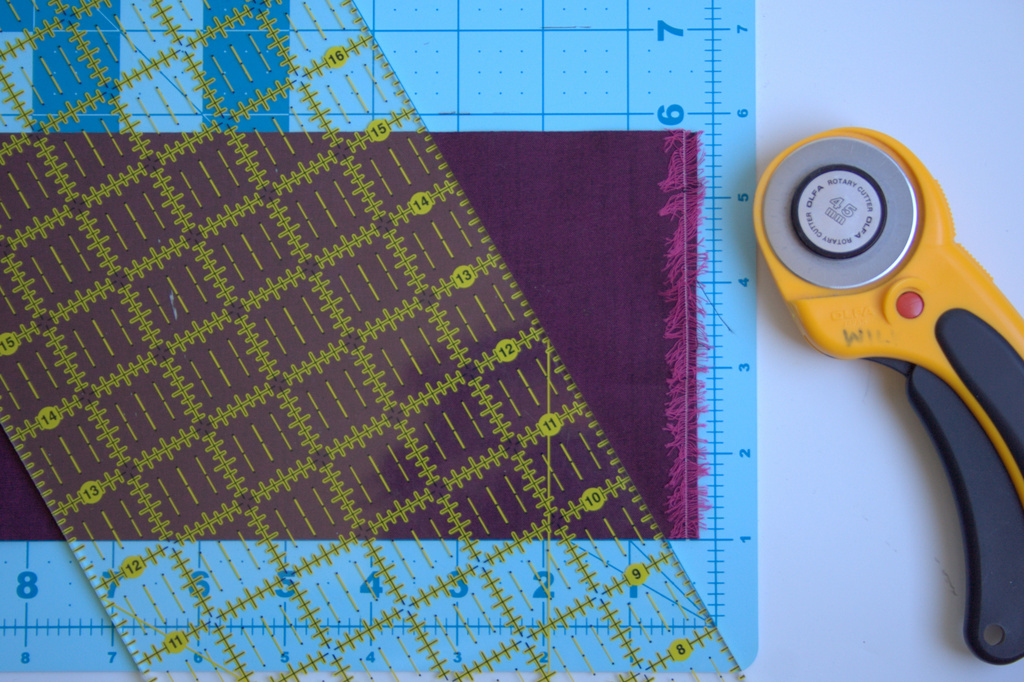
Measure and mark 1 ⅞” (1 ½” from the bottom seam stitch line) up and 1 ½” in from the side on each bottom corner, as illustrated above.
Step 6
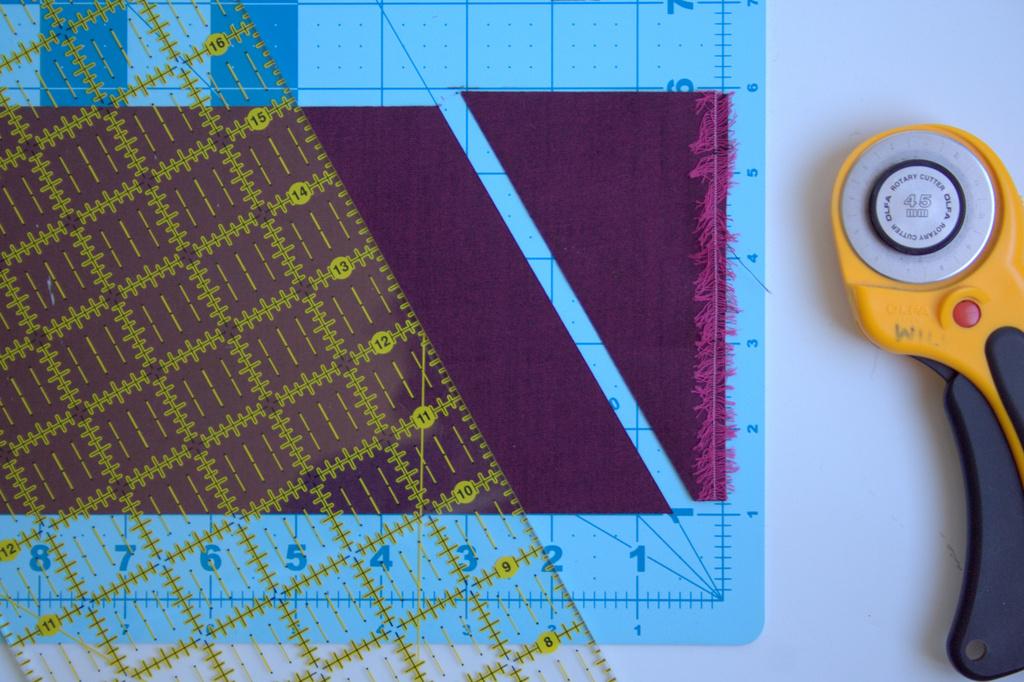
Carefully cut out the marked squares and discard.
Step 7
Opening the bin, fold the recently cut opening so that the bottom seam and side pressed seam match, right sides facing.
Carefully pin or hold in place, and sew along the opening with a ¼” seam. Be sure to backstitch at the beginning and end. Repeat for the other bottom corner.
Your bin exterior should look like the photo above.
Step 8
Turn bin right side out, press out the bottom corners, admire, and set aside the exterior of your bin.
Making the Lining
Repeat Steps 2 through 7 with the lining fabric to create the lining of the bin.
Finishing
With right sides out, carefully slide the lining fabric into the exterior of the bin, aligning the back seams and pressing the bottom corners into each other so that it fits snuggly. The exterior and lining should be wrong sides facing each other and the lining should extend about 1” above the top of the exterior.
Fold the lining down toward the outside of the bin so that the raw edge of the lining meets the raw edge of the exterior (approx ½”).
Fold again, so that the lining folds down over the exterior, with all raw edges contained inside the folds. Press carefully around the top edge of the bin so that your fold stays in place. You can pin or clip, or live on the wild side and simple feed carefully by hand as you stitch it down.
Carefully topstitch approximately ⅛” from the bottom fold of the lining around the top of the bin. Backstitch to secure threads, or knot and bury your threads. Here you can use a contrasting 12wt or 28wt thread for extra interest if you want!
I used my Aurifil 50wt 2600-Dove and a 3.0 stitch length so that it provided a bit of interest matching the pattern on the Alison Glass Sun Print Grow in Pansy I used for the lining.
Ta da! Your first Skinny Bin is compete! Arrange your Aurifil thread card strips delightfully, channeling your inner florist vibes, or fill with scraps or a bottle of your favorite bevvy.
Feel free to personalize the outer panel, too! Add-on exterior patterns may be available one day if the desire is high. Please use #fabricskinnybin and tag @nightquilter so that I can admire your Skinny Bins, too!
If you don’t yet have an Aurifil thread color card, ask your local quilt shop or order from Hawthorne Threads. Then check out our guest post on Auribuzz to see all of the fun ways you can organize and store it!
Well, I did it again. While I knew I couldn’t commit to another 365 days of stitching like last year’s One Year of Stitches embroidery project, I couldn’t pass on the opportunity to jump on another daily creativity bandwagon.
I’m officially 11 days into The 100 Day Project, and my focus is on sewing smaller. So far I’ve sewn 11 tiny quilt blocks that will finish at 1 1/4″ square. I’m using the hashtag #100daysofsewsmaller on Instagram and aiming to share my progress daily.
Here is a closer look at each of my blocks thus far!
1/100
2/100
3/100
4/100 (which was also the day when I created a foundation paper pieced template for my day 11 block. I didn’t sew that one until today, but the idea was born on day 4!
5/100
6 & 7/100 – Day 6 was the day of my daughter’s First Communion & Confirmation and my family was visiting all weekend, so I got a self-granted “bye” on posting. I caught up on my birthday, day 7!
8/100
9/100
10/100
11/100
I’ve been sharing updates on both my @nightquilter feed and also @thequiltersplanner feed, since I’ve been using my Quilter’s Planner to track each block.I am making blocks that fit perfectly in each daily column on the weekly planning pages, so it works wonderfully. My planner is always open to the weekly planning pages, so it is a great way to get a visual of my week’s blocks together. Maybe for my next post I’ll show you a photo of my blocks on my personal in-use planner instead of the nice neat, clean one I have for staging photos!
I’ve been having fun taking summary photos for the QP feed, since I love creating rainbows in any way possible.
Days 1-3
The first week of blocks
The first 10 days
Going into this project, I first imagined making the same block for 100 days, but once I started stitching them, I started to think about how many different blocks could be sewn in miniature. So then my plan morphed into 10 different blocks sewn 10 times each, alternating color and background like the first 10 blocks. It would allow me to mix up the blocks sewn, still play with color and tiny stitching, and have a pretty predictable finished 12″x12″ mini at the end of the 100 days.
I love how your challenge is going Kitty and how it relates to you as a quilter but also think you should let it be organic and use the 100 days to explore if needed and push yourself also if needed. Don’t get locked into a direction.
How wise is that!? What better activity than a 100 day project to use as a springboard for experimentation and stretching the limits and bounds of my creativity!? It is so ingrained in my habit to be able to visualize the end product before I begin a project, and I really think it would be a great growing experience for me to let go, give myself some very loose guidelines, and just allow myself to experiment.
So, that’s the plan. My “rules” are:
I am only allowed to use scraps from my scrap bin, and will aim to make them using a colored scrap with a white or low volume scrap.
I will do my best to stay current, but am allowed to work ahead up to 5 days. This (I’m hoping) will allow me to stick with it even when there are days when I know I won’t be able to get to a sewing machine. It’s my attempt at being gentle with myself while still pushing myself to stick with a habit of making.
I have to have fun with it. If it becomes a stress or source of self-deprecating thoughts, I will stop and try again next year. The last thing I need is another “I should be able to…” thing to beat myself up over.
and recently added: I will try NOT to plan at all, will experiment as desired, but will try to keep at least one dimension of each block at 1 1/4″ finished size.
That’s it! So far, all of my blocks are 1 3/4″, which will be 1 1/4″ finished.
I’ve worked ahead twice (once when my entire family was visiting for the weekend for my daughter’s First Communion, and once today since I know weekends are often filled with family time and not necessarily sewing time), but have stuck with the block per day format.
Most importantly, I’m having FUN! I had forgotten how giggly-fun it is to sew on a teeny tiny scale, and with lots of exciting big (albiet secret) projects going on behind the scenes, it’s really fabulous to have a little project I can sew and share daily.
I’ll leave you with a cheeky peek at the backside of my latest block, since one of the big questions I’ve gotten so far over on Instagram is “How big is your seam allowance?”. My answer: 1/4″ seam allowance, just like always. Note that so far I’ve created blocks with mostly straight joins, and I might scale a few seam allowances down to 1/8″ to decrease bulk as I experiment further, but for the most part, the 1/4″ seam works just fine!
If you’re on Instagram, you can follow my daily progress both in my Night Quilter feed or updates in The Quilter’s Planner feed. You should also be able to see my latest Instagram posts over on my right sidebar -> so keep an eye on that as well!
Until next time, I hope you have a *little* stitching fun this weekend!
Have you been eagerly awaiting the tutorial for the fabric Skinny Bins I showcased during Mister Domestic’s Sewing Party with Art Gallery Fabrics? Today, you’re in luck! The full photo tutorial went live over on the Quilt Theory blog today, offered in celebration of our Collection 2 Pattern release week! Check it out here!
As I mentioned in my post a few week ago, the list of use ideas for this tall and skinny fabric bin just keeps growing. From sorting tiny fabric scraps to housing your favorite adult beverage bottle, the sky’s the limit.
Today I’m also sharing one such use over on Auribuzz, the Aurifil thread blog. It turns out that my Skinny Bins are the perfect size for holding cut up Aurifil thread card strips, too! Yvonne from Quilting Jetgirl and I co-wrote a post for Auribuzz all about how to cut apart your Aurifil thread color card and the many ways to display and store the strips, since cutting the cards really is super helpful when it comes to finding that perfect color match.
When you make your own fabric Skinny Bins, please use #fabricskinnybin and tag me @nightquilter and @quilt.theory so that I can see them (and see how you decided to use them!). Patterns for customizing the exterior panel will be available in the coming weeks.
I thought this also might be a great time to share that I’ve been selected to be an Aurifil Artisan for 2017, so I’m honored and excited to be a part of the talented team of makers that love to work with Aurifil thread. Visit this post on the Aurifil blog to see the whole Aurifil Artisan team!
Today I’m excited to be a part of the Oakshott Lipari blog hop, your final stop for those of you who have been following along. So many fabulous projects have been made with the fat eighths bundle of the new Lipari line, so I encourage you to also check out the others along the hop, linked at the bottom of this post. Many thanks to Lynne and Michael at Oakshott for including me in the hop!
This was my first time working with Oakshott fabrics, and they are so luxurious! They are a woven fabric and feel almost silky to the touch. They feel more substantial than other shot cottons I’ve used, and the Lipari line looks iridescent since the warp is black and the weft is a bright jewel tone. These fabrics come to life when you see them in person–photos truly don’t do them justice. The Lipari line was inspired by volcanoes and the description from Oakshott says it best: “Lipari perfectly captures the primordial beauty of the Aeolian islands. Its luminous colours mirror cobalt seas, lush greenery, pink bougainvillea and shimmering sun; a beauty shot through with dark, fine-grained volcanic rock and black sand.” As soon as I read this description, I knew my quilt had to be a reflection of this volcanic inspiration. Thus, my Vesuvius quilt was born.
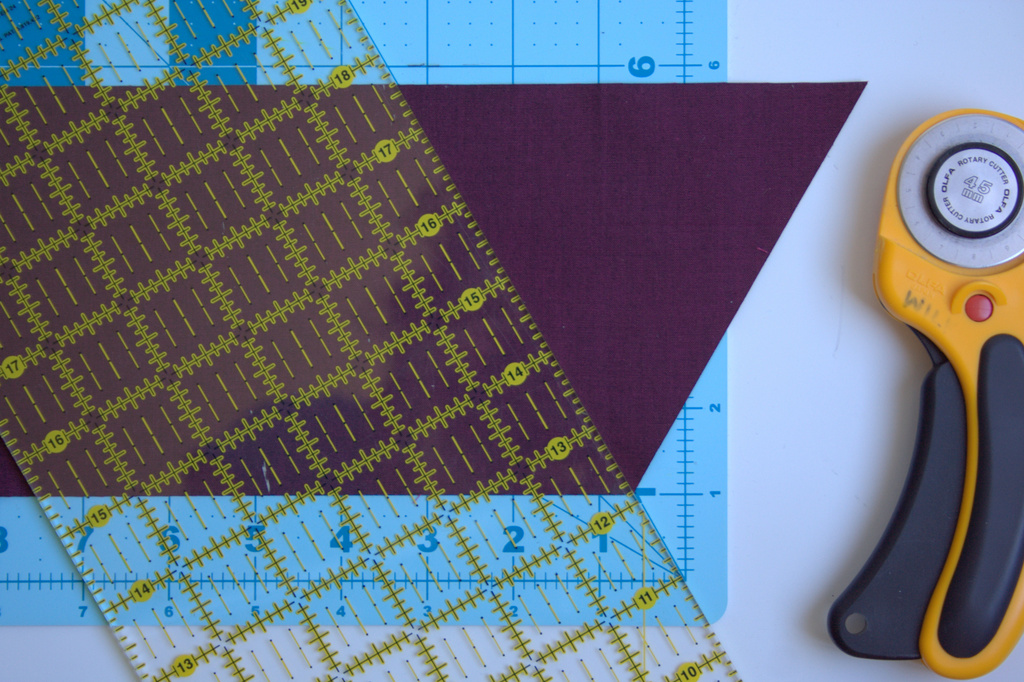
I made my Vesuvius quilt with 60 degree triangles, to elicit the sharp peaks of the mountainous volcanoes. I pulled in some Ruby Red – Toledo for the molten focal triangle, and let the Lipari steal the show. I used my Sizzix die cutting machine to speed up the cutting process. I really wanted to photograph this quilt next to a volcano, but I had to settle for some blueberry barrens and a Maine coast beach.
I quilted Vesuvius with 50 wt Aurifil thread 1246-Grey, which blended wonderfully with the Lipari Pollara (grey) I used as a background color. I used the walking foot on my domestic Bernina 560 to quilt straight lines 1″ apart, switching up directions in various sections of the quilt to provide movement and added interest. I LOVE how it turned out!
The Lipari Porticello (dark green) backing shows the quilting wonderfully, although it’s tough to get the full effect through photos!
I was torn on what color to use as the binding, but decided that Lipari Gallina (purple) frames it nicely.
This quilt finishes at 36″x43″ so would make a wonderful wall hanging or sophisticated baby quilt. You could also add borders to make it larger.
Tutorial
Here’s how to make your very own Vesuvius quilt! (Note that Oakshott Lipari fabric is 54″ wide. Typical quilting cotton is approximately 42″ wide, so plan accordingly)
Materials
A fat eighths bundle of Oakshott Lipari
1/8 yard of Oakshott Ruby Red Toledo
3/4 yard additional Lipari Pollara (grey)-negative space
1 1/4 yards Lipari Porticello (dark green)-backing
1/3 yard Lipari Gallina (purple)-binding
42″ x 50″ piece of batting
Sizzix die cutting machine
Sizzix XL Triangle, Equilateral 4 3/4″ x 5 1/2″ unfinished die
–OR–
Rotary cutter, cutting mat with 60 degree lines, and ruler
Thread (I used Aurifil 50wt 1246-Grey for both piecing and quilting)
Sewing machine with a walking foot (I use a Bernina 560)
Rotary cutter
Hera marker
Pins
Small thread snip scissors
Cutting
Using your method of choice (see below for instructions for each method), cut the following number of triangles from each fabric:
88 grey (Lipari Pollaro)
9 red (Ruby Red Toledo)
From fat eighth Lipari bundle:
20 purples
27 greens/yellows
12 browns
19 blues
4 black-red
8 black
Using a Sizzix die cutting machine
I used my Sizzix Fabi and BigZ Triangle, Equilateral 4 3/4″ x 5 1/2″ unfinished die to speed up the cutting process.
When using your sizzix, cut 5″ x width of fat eighth strips of fabric of each color, fold them over the die blade in the Sizzix cutting sandwich (bottom cutting pad, die with the blade face up, fabric, top cutting pad), and cut 9 triangles at a time. Note that the Oakshott fat eighths are 10″ x 27″, which are larger than a typical quilting cotton 9″ x 21″ fat eighth.
After passing each strip of fabric through the Fabi die cutting machine, you can reposition the remaining fabric and cut triangles from the “scraps”.
If you don’t have a Sizzix, read on to find out how to cut 60 degree triangles with your rotary cutter, using the lines on your cutting mat.
Using a rotary cutter and the lines on your cutting mat
First, cut strips 4 3/4″ by width of fabric. *Note: You can leave the fabric strip folded in half or doubled up if you’re using the width of fat eighth strips, allowing you to cut two triangles at a time!
Find the 30 degree line on your cutting mat. Yes, we are making 60 degree triangles by cutting along the 30 degree line (You have a 90 degree square to begin, trim off 30 degrees, then you’re left with 60 degrees!)
Align the bottom of your fabric strip along the 1-inch line. I use the 1-inch line so that you can see where the 30 degree line extends above and below the fabric. Place the edge of your ruler along the 30 degree line.
Using your rotary cutter, cut your fabric on the ruler angle.
Flip your fabric strip over, then align the bottom edge with the 1-inch line on your mat, so that the bottom point of your cut is on the 30 degree line.
Again, place the edge of your ruler along the 30 degree line. Using your rotary cutter, cut your fabric on the ruler angle. You now have your 60 degree triangle, or two (2) if you kept your fabric strip folded in half. Cut as many as you need.
Piecing the Quilt Top
Once your pieces are cut, lay them out as shown. A piece of batting wrapped around a large wall board works well, but I have been often known to use my design floor to help with layout, too! (SizingNote: if you want a larger quilt, you could add a row of grey (Lipari Pollara) triangles to the right and left sides before sewing the rows together to maintain the outer triangle points when adding borders. Then, trim square and add rectangular borders to the desired size.)
Be sure to keep the grain of fabric running top to bottom (the woven texture of the Oakshott Lipari makes this easy to do since the grain is clearly visible when the fabric is held up to the light). Once your pieces are laid out as desired, it’s time to sew them together! Chain piecing helps the process go quickly and smoothly. Here’s how to set it up.
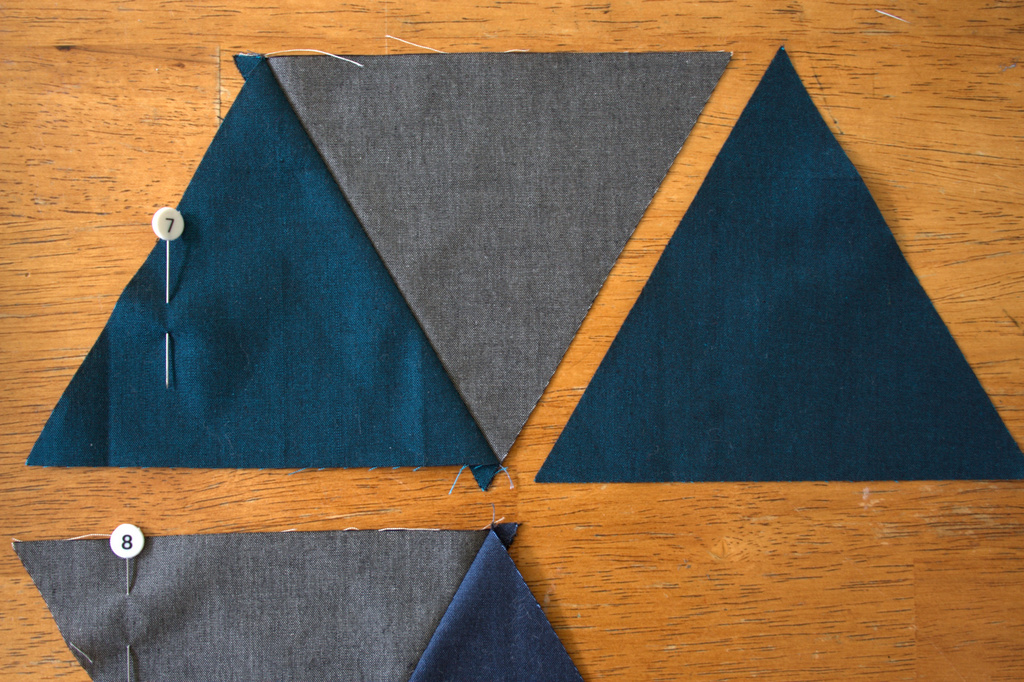
Label each horizontal row. I began with 1 on the top and ended with 11 on the bottom and used pins to label the first piece in each row (Note that I labeled each row after stacking, so the pins aren’t visible in these photos).
Carefully stack the triangles from each row, with the far left piece on top, and keeping the triangles facing the proper direction (this will help you keep them straight while piecing). For example, for row one, you will have the labeled first triangle piece from the far left on top, and carefully pick up each triangle across the row, adding it to the bottom of the stack.
Once you have your row stacked, use a clover clip or similar device to hold the stack together.
Gather all of your rows in this manner.
Lay them out in order, making a clear mental note of what row is located where. You could label a sticker on the table next to each stack to help, although simply keeping them in chronological order works well for me. Let’s sew! (Note that a table next to you works better than having the stacks this close to the sewing machine. As you add pieces, your strips will drag your stacks around if you keep them here as shown!)
To speed up the process, we will be chain piecing (sewing without stopping) the first piece to the second piece from every row. Note: Be sure to keep the pin labeling each row in the first block at all times!!
Once you have all of your first pieces sewn to your second pieces, trim the threads to separate, and press. All these bias edges means this is a great time to practice pressing, and NOT ironing. Press: up, down, up. Great!
Alternate which side you press your seam for each row. I pressed odd rows (1, 3, 5, etc.) to the left and even rows (2, 4, 6, etc.) to the right. Pressing open also works well!
Next, add the next triangle to each row, chain sewing again. You’ll be sewing the third triangle (which is now on top of each stack) to each row. Double check the number pin on the sewn row before adding the next triangle, since you want to be sure to keep your gorgeous layout intact.
Continue chain piecing, trimming, pressing, and chain piecing again until all of your rows are assembled. As you add each triangle, stack those corners and everything will be right in line!
Sew all of the rows together, pressing seams up toward the grey triangles. I like to pin about 1/8″ after each point where the triangle points will be matching up, and aim to sew *right* through the center of the seam-cross to make sure you don’t cut off any points when sewing the rows together.
Quilting & Finishing
Once your quilt top is pieced, baste as desired. I decided to quilt my quilt before squaring it up because of all of the bias edges. I used 505 basting spray and spray basted for the first time! I used Christa Watson’s design wall spray basting tutorial and can see why people love it.
I decided to quilt my quilt with straight lines 1″ apart using the walking foot on my Bernina 560. I used a hera marker and a long quilting ruler to mark lines 1/2″ from some seams, and then 1″ apart from there. I sectioned the quilting in a few different sections, using straight lines 1″ apart but changing directions in each section. Lines intersect in the Ruby Red triangle, “exploding” out to the sides (like a volcanic eruption!?). The quilting lines don’t intersect anywhere else in the quilt. I really love the finished effect.
After quilting, it’s time to square up the quilt. Using a long, straight edge, trim 1/4″ away from the outer points so that you don’t lose any points when you sew on the binding. Use at least two sets of points to make sure your ruler is straight before cutting.
Square up your quilt, trimming off the excess, then bind!
Viola! Enjoy your Vesuvius Quilt, and please use #vesuviusquilt and tag me @nightquilter if you decide to make one.
Many thanks, again, to Oakshott for providing the fabrics for this project, and for including me in the hop. Make sure to check out the rest of the amazing Lipari projects:
*BREAKING NEWS* Volcanic action alert
For those of you who follow me on Instagram, you may have seen the heart-wrenching fate of this quilt, that I so unknowingly aptly named “Vesuvius”: my nearly-four year old son cut into it in three places (along with a trail of destruction that included my Machinger quilting gloves cut into pieces and cuts into a big chunk of fusible fleece). With the great outpouring of support, commiseration, and suggestions offered by the fantastic community on IG, I’ve decided to make the cuts an added design element, another chapter in the story of the quilt, and sew either black or red patches over the cuts, making them into “fault lines”.
One of three cuts, now called “fault lines”, made into the edge of this quilt by my nearly-four year old son.
For now, though, I will put the quilt aside until I can dive into the repair with chuckles and reminiscence instead of lingering tears and frustration. I know that my son did not cut into my quilt maliciously, but it still is a difficult experience. I have made it known that if he ever wants to cut fabric again, he can tell me and I will help him make a quilt. We’ll see where it goes. For now, my Vesuvius Quilt (aka Max’s Fault Lines) is smoking and being buried by ash for a bit. It will rise again some day in the future.
Remember that mini mini quilt craze that spread like wildfire among quilty bloggers about eight months ago? Yeah, me too. The fun news is that with the recent feature in Make Modern magazine, the mini mini quilt spark is being fanned back into life with a Mini Mini Quilt Challenge. You can see a fun inspiration gallery of mini mini quilts in the recent issue of Make Modern (Issue 11), including a couple made by yours truly, and there’s a community wide challenge running now through June 20th to help inspire more mini mini madness. Read more about the challenge here, or check out the hashtag #MMminimini to see what creative mini mini quilts have been created thus far (and add your own to the pool!).
I’d like to say the mini mini quilts I’m sharing today are newly inspired and whipped up in response to this fun challenge, but no. I’ll be honest. I began both of these many, many months ago, and they were worked on at a snail’s pace, off and on. I’m almost embarrassed to share these finishes, since they have taken me so ridiculously long to finally finish. But I know that you understand, and that you would want to see the finished mini mini quilts even if it took over 8 months (gah!) for me to finally buckle down and finish them. So, without further delay, my latest mini mini quilt finishes:
Slow Growth
This mini mini quilt was made for Allison at Campbell Soup Diary (you can see the amazingly wonderful mini minis she made me here and here). When we first decided to exchange mini minis, she offered this as guidance: “As for colors that I like… AG grove in grass green is THE perfect shade! I tend towards pinks, purples, oranges, yellows, but generally stay away from blues unless it’s a really nice royal. Turquoise is great, but red is the one color that is almost always left out of my color palette. (don’t ask me why, but I even avoid it in my garden and my wardrobe) If given the choice between straight lines and wonky, I prefer straight. I love natural and soft shapes, but I also realize that that cannot easily be pieced.”
For some reason, I latched onto the AG grove in grass green (of course), paired with the favorite colors of pinks, purples, oranges, yellows. I wanted to create something with natural and soft shapes, so immediately thought of needle-turn applique. The rest of this mini mini just sort of happened as I stitched. The mod leaves and flowers are needle-turn appliqued, and then I used 12 wt Aurifil thread to embroider details on the flowers.
The snail was not initially intended to be part of this mini mini, but in fact was the result of a mini mini travesty: my three year old son found my little scissors and in playing around, cut a small hole right in the mini mini quilt!! After taking many deep breaths, probably yelling at least once and emphatically saying that it was NOT ok to cut mommy’s sewing, I decided to make lemonade out of lemons and needle-turn a little patch over the hole. With a bit of embroidery embellishment, a little slow growing snail was born. It ends up this snail was the perfect symbol of this project, and ultimately inspired its name: Slow Growth.
I densely hand quilted this mini mini with a variety of weights of Aurifil 2600-Dove (50wt, 28wt, and 12 wt), essentially hand-matchstick-quilting the 5″x5″ quilt. I improv-ed the quilting and included a few rows of X’s and one of little bubbly O’s for interest. I used a super thin binding for this (1″ strip to start, single fold), and although finicky to sew on, I really like the feel and aesthetic of the skinny binding. Even if it took ages, there are many positive, grateful, creatively generous thoughts stitched into this mini mini, Allison! I hope you like it!
Too Tiny
This next mini mini quilt was an experiment in how small can you go, and I determined that I reached my tiny threshold, at least with this foundation paper pieced pattern. The intended recipient of this mini mini is a big fan of the color purple, and I also knew I wanted to make her a feather mini mini. I wanted it to be unique, though, so I designed my own teeny foundation paper pieced pattern of a geometric feather.
I absolutely love tiny stitching, mostly because of the giggles that reflexively bubble over while I’m piecing the ridiculously tiny pieces. This tiny feather was no different, until it came time to sew the two sides together. The seam was crazy thick; so thick, I had to hand crank my sewing machine to get the needle through it without breaking (I broke a needle trying the first time). With a seam that thick, you can guess how great my chances of pressing it flat might be–slim to none! My solution? I stuffed actual wool batt behind the feather and then quilted around it as best as I could. It’s not exactly trapunto; it’s more a stuffed feather!
My reverse needle-turn applique skills have room for improvement, and the shaft of the feather didn’t work as well as I had hoped. I decided to embroider over it with 12wt Aurifil to try to give it a more intentional look, and I’m much happier with the result. The Anna Maria Horner loominous fabric was the perfect background, and I machine quilted horizontal lines with 50wt Aurifil 2560-Iris.
I used the backing as binding and folded over a larger portion on this mini mini quilt, since I felt it needed a stronger frame due to the visual weight of the 3-dimensional feather. Mini mini quilts certainly keep me humble, since every little stitch is visible, and the wobbles and less-than-perfect corners are part of the charm.
I signed the back with quick embroidered initials and date, since I feel strongly about signing all creations, no matter how small.
Both of these mini minis are going in the mail today. Once I finish a bit more of the projects on my to-do list, I am sure to revisit the mini mini quilt making scene. I still have one more promised mini mini quilt that is in progress for a friend who has already sent one in return (ages ago), and my very first mini mini swap for which I need to redo the binding. I think I agreed to swap with at least two others, but we left it open and relaxed and since I have not received a mini mini in return, I don’t feel *quite* so bad letting the creation of my mini mini quilt slide. All in good time, right?
Have you made a mini mini quilt yet? If you feel so inspired, I encourage you to post a photo on Instagram with #MMminimini to join the fun (and enter to win prizes!). I’d also love to see it, so tag me @nightquilter so that I can see your tiny beauty!
I recently hit a pretty big milestone over on Instagram when I surpassed 3K followers, so to help celebrate that (and the fact that it was my birthday yesterday), I’m hosting a pretty epic giveaway over on Instagram. If you haven’t seen it yet, check out my feed @nightquilter and enter to win! The giveaway will close tomorrow (Monday) night at 9pm EST.
I figured I couldn’t go wrong giving away some of my all-time favorite fabrics and threads, and I’m so very grateful to my sponsors for donating the prizes. The prize package contains (from left to right): a fat quarter bundle of Endpaper from Sun Prints 2016 by Alison Glass (Andover) donated by Fiddlehead Artisan Supply; a low volume bundle of 14 gorgeous quilting cottons curated my yours truly donated by Fat Quarter Shop, and the Simply Color by Vanessa Christensen large spool set of 50wt Aurifil thread donated by Alex Veronelli at Aurifil. Many, many thanks!!
Fat Quarter Shop also sent a low volume bundle for me to keep since I curated it, so I’m super excited to be restocking my low volumes! The low volume bundle is available here. Go check it out, and if you love low volumes as much as I do, I hereby give you permission to treat yourself!
I included a little bit of everything in this bundle, including Cotton + Steel basics, Modern Background Paper, Lizzy House mini pearl bracelets, prints from Anna Maria Horner’s newest line, a print from Wonderland by Katarina Rocella, those adorable scissors from Maker Make by Art Gallery fabrics, and more. You’ll have to visit the post on Fat Quarter Shop to see the full list of included fabrics, but I can tell you I’m loving every one and already plotting the next low volume + rainbow Alison Glass fabrics project (are you surprised?).
As always, I’ll be sure to show you once I start putting these fabrics to use. In the meantime, head over to Instagram to enter for a chance to win your very own stash building prize package! I apologize to those of you who don’t have Instagram, but there’s sure to be another great giveaway here on the blog, too. Surpassing 3 thousand followers needs some celebrating!
I’m linking up with Molli’s Sunday Stash, since my low volume stash grew in a fabulous way this week, and one lucky follower will be REALLY building his/her stash soon! Best of luck!
Today I’m sharing the tutorial for how to make the outer panel of a Zippy Quilter’s Planner Cover like the one I made. I’m calling it Riot of Color and it’s a tribute to Alison Glass and her consistently bold and beautiful fabrics. A full color pdf of this tutorial is available on the Quilter’s Planner website, so head on over there to download it!
This tutorial is for creating the outerpanel for the Zippy Quilter’s PlannerCover pattern customized by Stephanie (Late Night Quilter) and Amanda (What the Bobbin) for the Quilter’s Planner. This tutorial will provide cutting and piecing instructions for the outer panel (11”x19 1/2”). From there, follow the instructions in the Quilter’s Planner cover pattern found at http://quiltersplanner.com to make the full zippy planner cover, using this 11”x19 1/2” panel as the “exterior fabric”.
The secret to this cover’s creation is the fabric choices. The dark grey of the Essex linen in Charcoal (Robert Kaufman Fabrics) lets the bright bold colors of Alison Glass’s Sun Prints 2016 and Art Theory panel in Charcoal (from Ex Libris – Andover Fabrics) shine. This could also be made using a favorite large scale print for the feature fabric and fussy cut bits for the squares, but be sure to use a contrasting solid or reads-as-solid background fabric so that the construction shines.
General Notes:Seam allowances are 1/4” throughout unless indicated otherwise. I like to press seams open, but in some cases I pressed to the side for this project. I will note those places in this tutorial.
Cutting
First, cut all of your fabric pieces according to the Cutting Requirements chart and diagram above.
A Note About the E Pieces
Here’s where I’m going to be real with you. The DE strips have a lot of seams. This means that if your 1/4” seam allowance is off by even a little bit, your strip may be slightly the wrong size. In the cutting chart above, I’ve accounted for this human error. (You’re welcome!)
*IF* your seams are an absolute perfect 1/4” and your cutting is precise, the top and bottom E pieces on both strips (four E pieces total) only need to measure 1 1/2” x 3/4”.
This tutorial allows you to trim the excess at the end so that you don’t have to worry as much about the precision of your 1/4” seam. That said, focus on straight, consistent seams and we will adjust for scant or generous seams during the process!If you feel like you want to be a Perfect Seams Superhero and save yourself some math and cutting, use 1 1/2” x 3/4” E pieces on the top and bottom of each strip. Go ahead and cut your pieces.
Ready? Lay it all out how you want it and then start assembling!
Assembly
Pair each D piece right sides together with an E piece and sew with a 1/4” seam allowance.
I like to get them all ready and then chain piece to save time.
Organization Tip Be sure to take a photo of your layout before sewing so that you have a visual reference along the way!
Set seams and press open. Lay them out again and check your reference photo. There should be one E that has not yet been paired and sewn. Pair and sew components of the DE strips until they are completely assembled. Press seams open.
If you are being a Perfect Seams Superhero today and used 1 1/2” x 3/4” E pieces on the tops and bottoms of your strips, confirm that your fully assembled strip now measures 1 1/2” x 11”, pat yourself on the back and skip ahead to the full panel piecing.
If you are being merely human today, give your strips a good press and lay them on your cutting mat. It’s time to measure how much excess you have and take care of it.
We want the finished strips to measure 11” long, but we want to be sure our colorful bitsstay centered. To do this, take the following steps (the example shown is in parenthesis):
Measure each strip to the nearest 1/8” being sure to press it flat so that it extends to its full length. (My strips shown measured 11 1/2” when I held them flat.)
Take the difference of 11” from the length of your strip. (11 1/2 – 11 = 1/2”)
Divide the difference by 2.(1/2” / 2 = 1/4”)
That’s how much you should trim from each end of your strip. (I trimmed 1/4” from each end)
Now, measure your strips again. Each strip should measure 1 1/2” x 11”. Don’t worry about a little wobble or wonk at this point. Everything will be smoothed out during the final assembly!
Next, we will piece the rest of the panel.
Lay out all of your pieces again as shown (left to right): C,DE strip, B, A, B, DE strip, C.
Sew them together!
Here’s the order in which I assembled it, but do what works logically for you.
Right sides together, sew B pieces to A. Press seams open. This is the BAB unit.
Right sides together and double-checking the orientation of the DE strips, sew C outer pieces to DE strips. Press toward C. These are your DEC units.
Sew DEC units to the BAB unit, pressing seams toward BAB.
Give your panel a good press, check that it measures 11” x 19 1/2” and trim if needed.
Have fun creating your own versions of this cover, and please tag me @nightquilter if you post pictures on social media. I always love to see what you create!
Love is always the key. We know that. But now we can also SEW that! Those who know me know that I am a sap for hearts and I see them literally everywhere. One of my proudest moments was the first time my daughter brought me a heart she found in nature. It was a dirty old dried up piece of orange peel that she had found in the gravel driveway, and she was filled to the brim with excitement that she had found a heart. Since then, Maddie and I (and now Max, a bit) have found countless heart rocks, heart sea glass, heart snowballs, heart leaves, and more… since truly, love is everywhere. Reminiscent story aside, today I’m excited to release my newest pattern: Love is the Key.
Love is the Key is a foundation paper pieced pattern that measures 9″ square, but with an option for a 4.5″ wide by 9″ tall version. It features a heart-topped key and is a very easy, beginner-friendly paper piecing pattern. Believe it or not, this pattern was first conceptualized and sketched almost a year ago, on my flight home from QuiltCon. It’s a mash-up of my Unlocked and Love Struck patterns, since who doesn’t need more heart-filled pattern options?
To help celebrate the month of love, this pattern release is also kicking off a pattern sale of all of my love-themed patterns, today through Valentine’s Day. That gives you ample time to sew up some love for your partner, your kids, your parents, or hey–even for yourself!
Grab Love is the Key for only $3 while you can! The prices have already been reduced in my Craftsy and Payhip shops. After Valentine’s Day, all patterns will return to their standard prices of $4.50 (but my love will still be there).
I always love to see what you create, so please use the hashtag #loveisthekeypattern and tag me @nightquilter when you share on social media.
I’m also excited about a few add-on pattern features I’m hoping to release soon. Most likely not by Valentine’s Day, but soon you will be able to stitch up a flying heart key, and will have top and bottom options for a “create your own adventure” key. So much fun. So much love.
Have you heard of Periscope? It’s an app for smart phones that allows you to live-stream videos straight from wherever you are. The idea is that you can discover the world through someone else’s eyes. This past week, a few quilt-blogger friends and I used it to lead tours of our honest craft spaces, and I got to peek into the homes of some of my quilty friends for the first time (and finally shared a peek at my honest–read: messy–craft loft). In the span of just over an hour, I was able to have a guided tour of seven diverse craft spaces across the country.
This started as just another crazy idea I was tossing around with my friends Stephanie from Late Night Quilter, Terri Ann from Childlike Fascination, and Daisy from Ants to Sugar. We decided to publicly (on Instagram, Facebook, and Twitter) post an invitation to join us on an Honest Craft Room Tour in Periscope, and then just jumped in and gave mini, 10 minute tours of our craft spaces, mentioning the next person in the tour at the end of our scopes so that viewers could “hop” to the next video. Early in the tour, Mandy from Mandalei Quilts joined the line-up, and then through the course of the night, Silvia from A Stranger View and Kelley decided to spontaneously join us. It was so much fun to take a peek into the spaces in which these quilter friends create. Our spaces varied from small to large, slanty-roofed loft to basement, messy to neat, yet they all housed so much creativity. It was a night of inspiration and strengthening connections. And it was loads of fun.
While a firm plan is not yet in place, we plan to do these Periscope tours weekly, most likely on Tuesday nights beginning at around 9pm eastern time. Each week will have a focus; maybe one week we will share our top five favorite quilting tools, another week share our latest works in progress, yet another week talk about how we go about choosing fabrics for a project. The sky’s the limit! What kind of videos would you like to see?
Followers of your periscope account get a notification when you are streaming live and can join in, watching and listening, and communicating by typing messages and tapping the screen to create a cloud of rising hearts to show the “scoper” that you like what he/she is saying. If you’re interested in giving it a try, here’s a helpful post with technical tips for getting started with Periscope. Be sure to follow me @nightquilter so that we can communicate in yet another way! Perhaps I’ll see you (literally) through the Periscope!
I grab a needle and thread once the kids are in bed


 With a focus on hope and new beginnings, I thought today would be the perfect day to re-release my updated Bean Sprout block pattern, since there’s nothing like a freshly sprouted plant to celebrate spring, new life, and the wonder of discovery. As many of you likely know, I’ve been working with the amazing Lindsie Bergevin to convert some of my older patterns into fresher, more professional, and often more diverse versions and Bean Sprout is the latest to receive a make-over.
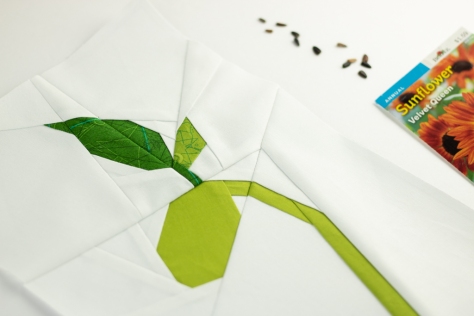 With a bit more pattern details, more professional layout, and an added block size (welcome, dear 4″x6″ block!), the newest Bean Sprout block pattern includes all of the great things from the original 2016 design, but in a clearer, crisper presentation. You can buy it now from my Payhip shop HERE. You can use code BIRTHDAY for 15% off it and all other patterns in my shop through the end of April, since I believe in celebrating birthdays all month long.
 You can see a few other versions of this block I’ve sewn up in the past in its original release post HERE. It’s always fun to look back into the blog archives, isn’t it!?
 I particularly love the idea of a pillow, and very well might be making another one of these someday soon. I’d love to see what YOU make with the pattern, so please use #beansproutblock and tag me @nightquilter on social media so that I can see your beautiful work.
 I recently faced the demon that was my chaotic sewing space and have been organizing with the help of my dear friend Alessandra. Yesterday when I shared the above photo of my newly cleared cutting table on Instagram, there were many questions about my rainbow of skinny bins hanging along the side of it. My skinny bins were made using a tutorial I wrote for Quilt Theory years ago, for a fabulous fabric party hosted by
  A few weeks ago, many fabric and thread companies were kind enough to send color cards to the Quilt Theory team to help with our planning. While brainstorming different ways to store and use these color cards, I realized that
 Sew the short ends right sides together using a ⅜” seam allowance. You will have a tube with both ends open. Press seam open.
 Centering your pressed seam (3 ½” of fabric should be on either side of the seam), press the tube flat, creating clear side creases.
 Measure and mark 1 ⅞” (1 ½” from the bottom seam stitch line) up and 1 ½” in from the side on each bottom corner, as illustrated above.
 Carefully cut out the marked squares and discard.
 Opening the bin, fold the recently cut opening so that the bottom seam and side pressed seam match, right sides facing.
 Carefully pin or hold in place, and sew along the opening with a ¼” seam. Be sure to backstitch at the beginning and end. Repeat for the other bottom corner.
 Your bin exterior should look like the photo above.
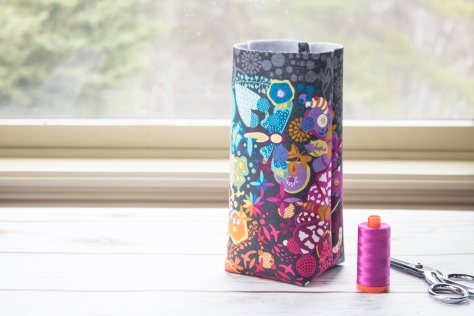 Turn bin right side out, press out the bottom corners, admire, and set aside the exterior of your bin.
 Repeat Steps 2 through 7 with the lining fabric to create the lining of the bin.
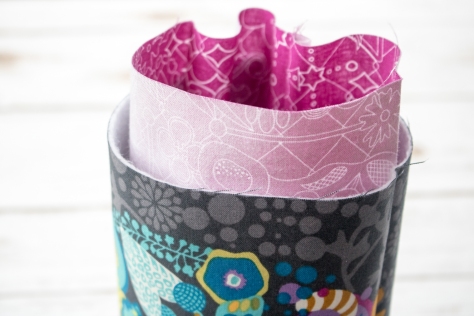 With right sides out, carefully slide the lining fabric into the exterior of the bin, aligning the back seams and pressing the bottom corners into each other so that it fits snuggly. The exterior and lining should be wrong sides facing each other and the lining should extend about 1” above the top of the exterior.
 Fold the lining down toward the outside of the bin so that the raw edge of the lining meets the raw edge of the exterior (approx ½”).
 Fold again, so that the lining folds down over the exterior, with all raw edges contained inside the folds. Press carefully around the top edge of the bin so that your fold stays in place. You can pin or clip, or live on the wild side and simple feed carefully by hand as you stitch it down.
 I used my Aurifil 50wt 2600-Dove and a 3.0 stitch length so that it provided a bit of interest matching the pattern on the Alison Glass Sun Print Grow in Pansy I used for the lining.
 Feel free to personalize the outer panel, too! Add-on exterior patterns may be available one day if the desire is high. Please use
  If you don’t yet have an Aurifil thread color card, ask your local quilt shop or order from
 I’m officially 11 days into
  1/100
1/100 2/100
2/100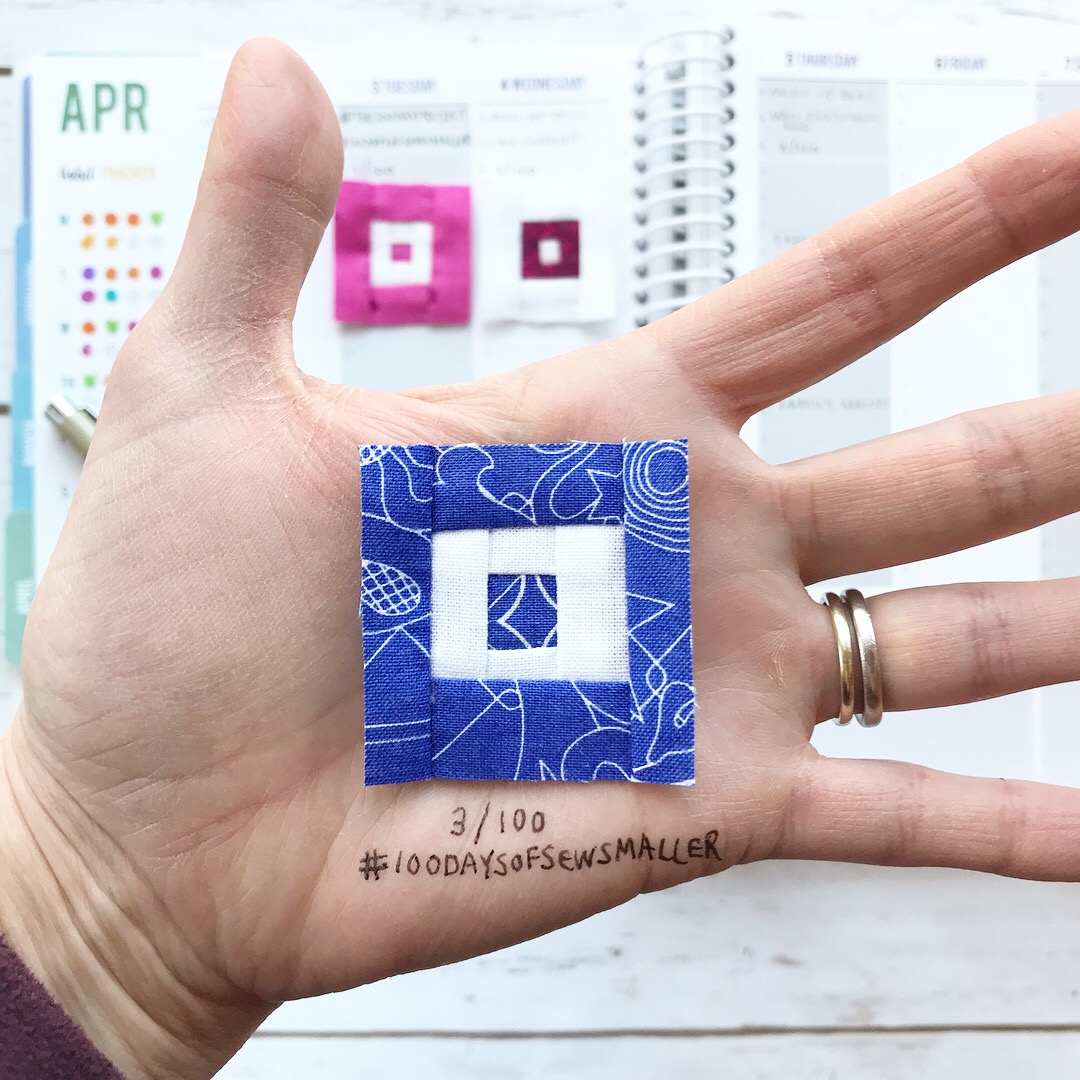 3/100
3/100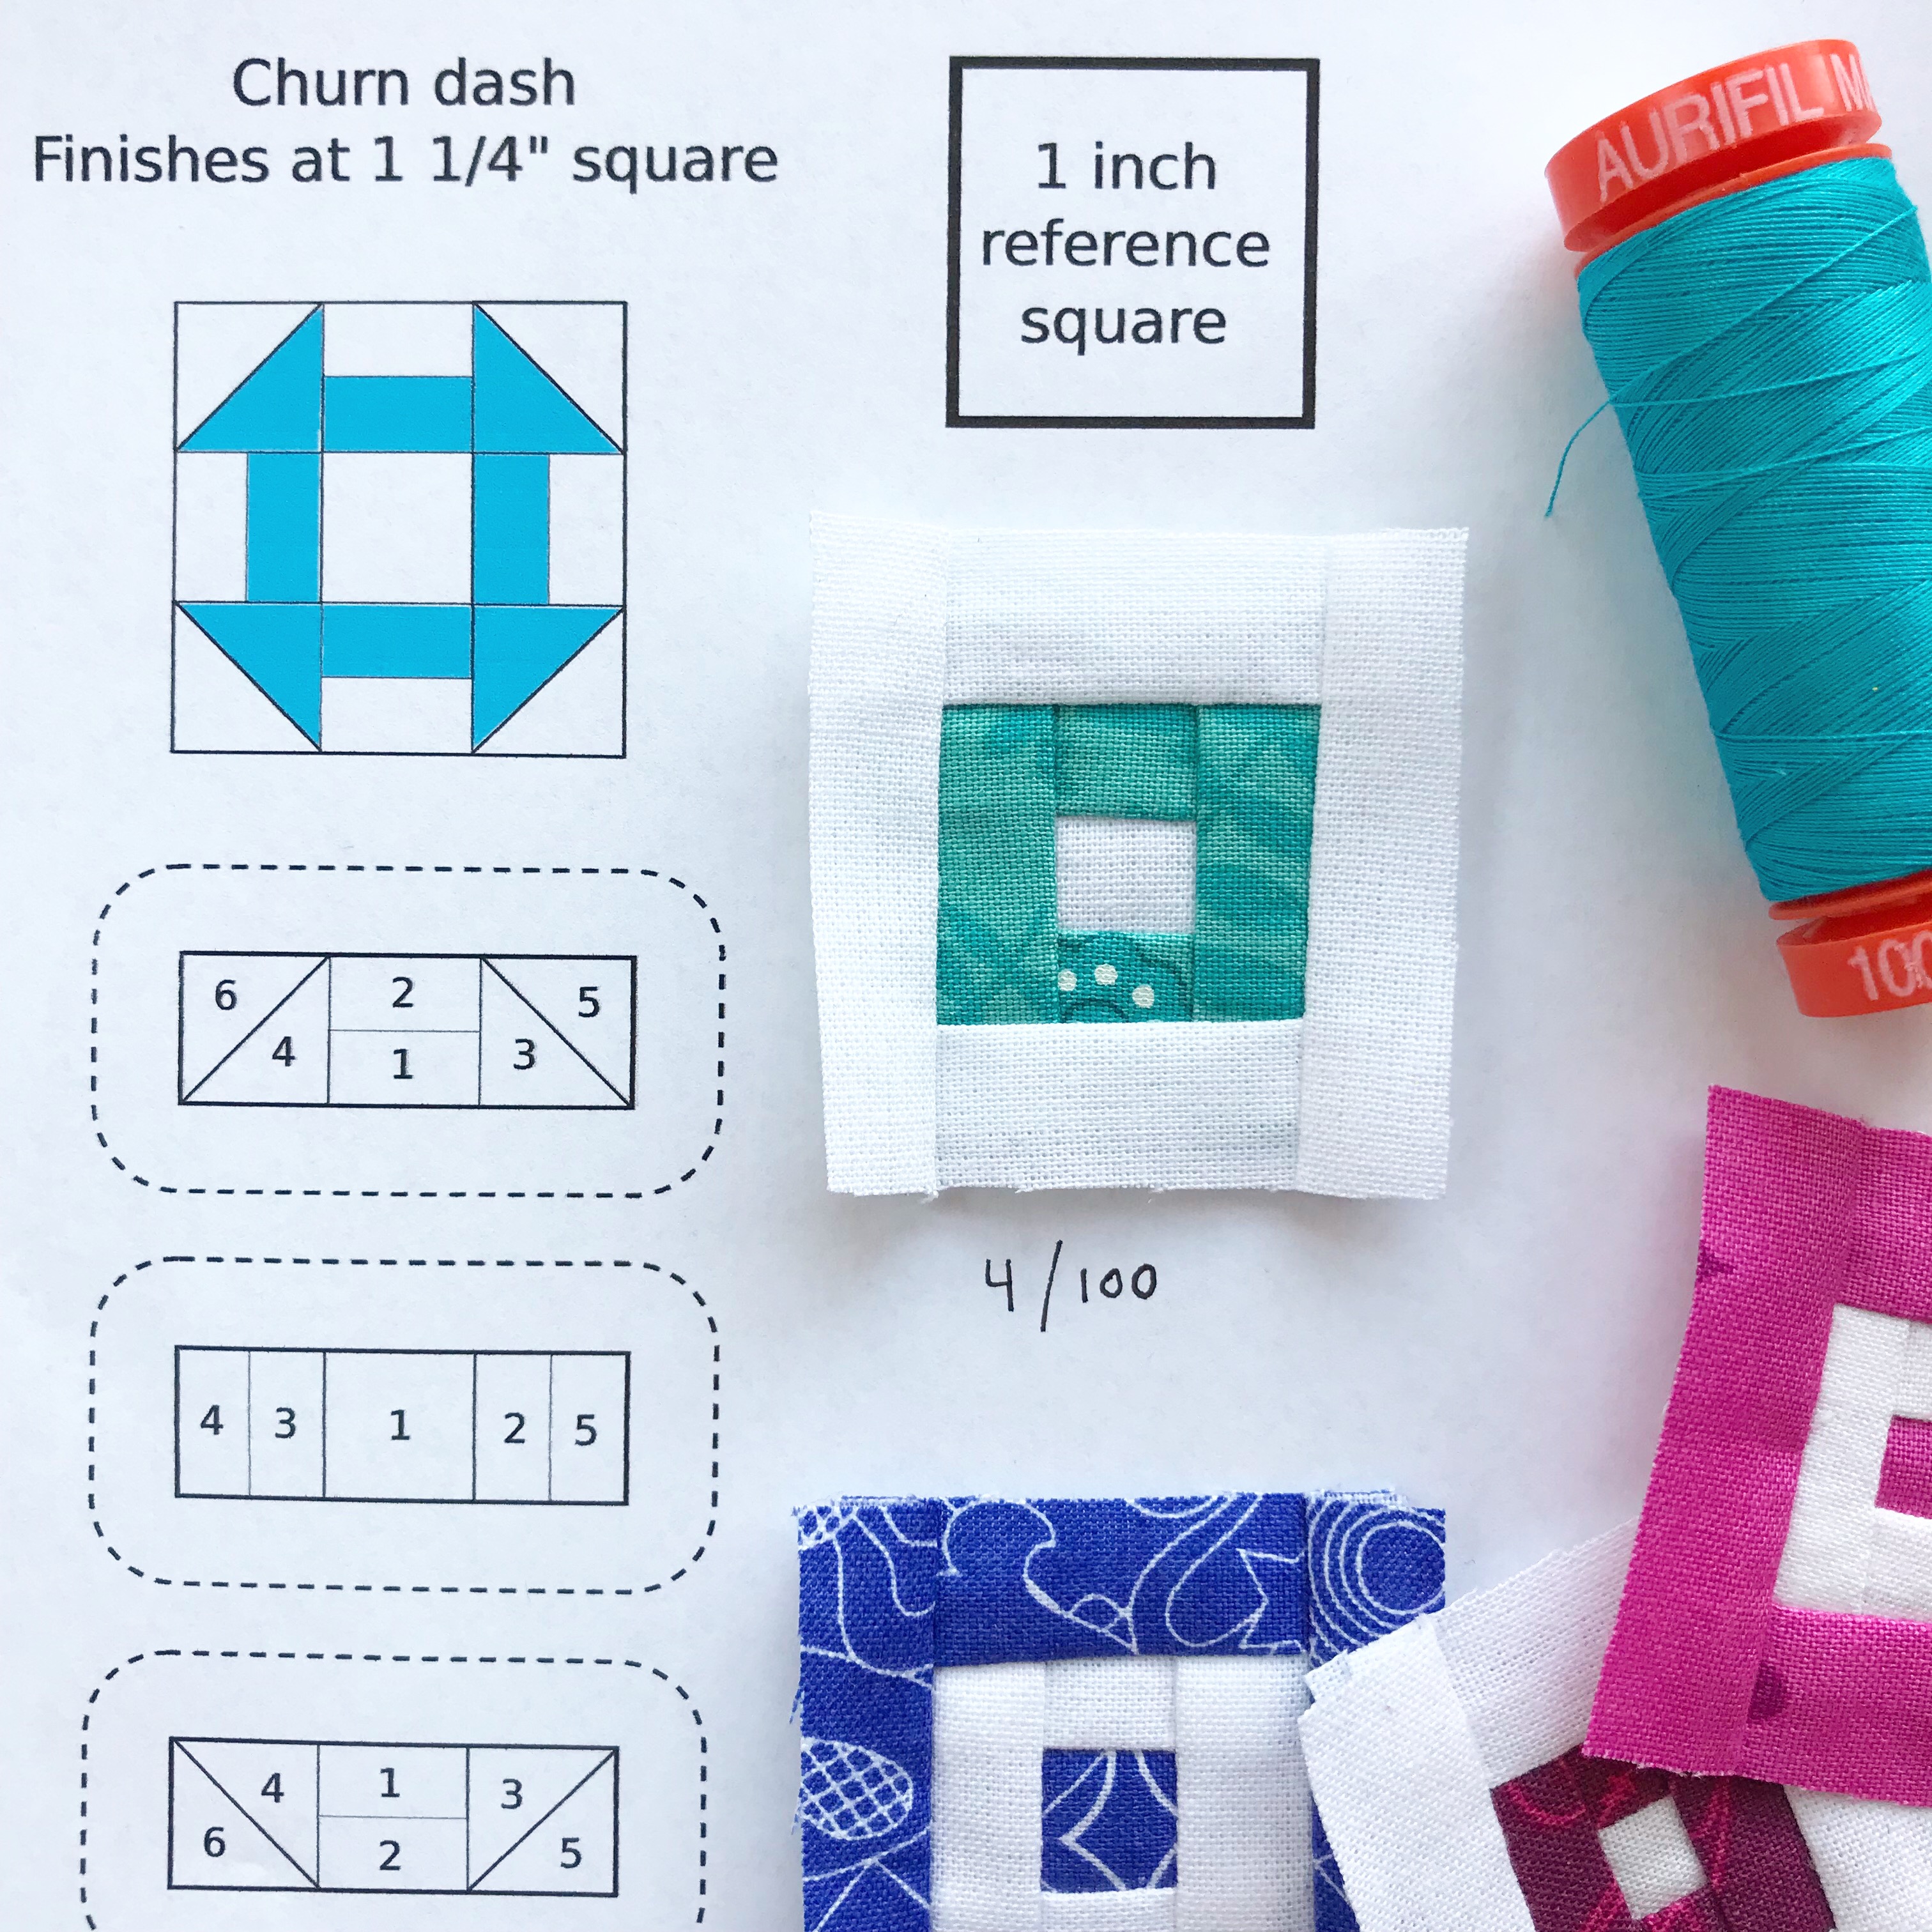 4/100 (which was also the day when I created a foundation paper pieced template for my day 11 block. I didn’t sew that one until today, but the idea was born on day 4!
 5/100
5/100 6 & 7/100 – Day 6 was the day of my daughter’s First Communion & Confirmation and my family was visiting all weekend, so I got a self-granted “bye” on posting. I caught up on my birthday, day 7!
 8/100
8/100 9/100
9/100 10/100
 11/100
 Days 1-3
 The first week of blocks
 The first 10 days
 I love how your challenge is going Kitty and how it relates to you as a quilter but also think you should let it be organic and use the 100 days to explore if needed and push yourself also if needed. Don’t get locked into a direction.
 I’ve worked ahead twice (once when my entire family was visiting for the weekend for my daughter’s First Communion, and once today since I know weekends are often filled with family time and not necessarily sewing time), but have stuck with the block per day format.
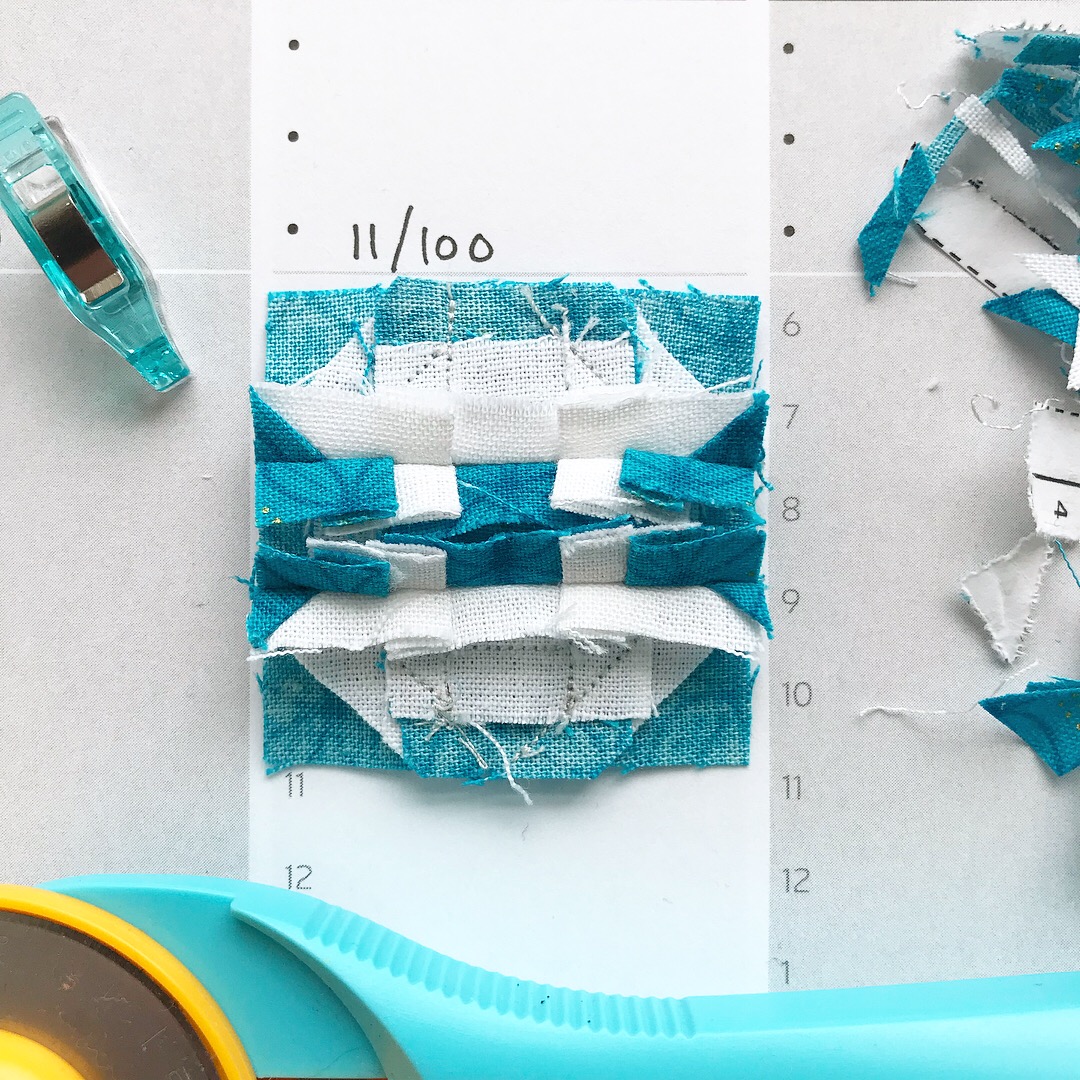 I’ll leave you with a cheeky peek at the backside of my latest block, since one of the big questions I’ve gotten so far over on Instagram is “How big is your seam allowance?”. My answer: 1/4″ seam allowance, just like always. Note that so far I’ve created blocks with mostly straight joins, and I might scale a few seam allowances down to 1/8″ to decrease bulk as I experiment further, but for the most part, the 1/4″ seam works just fine!
 As I mentioned in my post a few week ago, the list of use ideas for this tall and skinny fabric bin just keeps growing. From sorting tiny fabric scraps to housing your favorite adult beverage bottle, the sky’s the limit.
 Today I’m also sharing one such use over on
  Head on over to the